| Apex
Webmail Spam Filtering Setup and Use
Please
follow the following instructions to set up spam filtering
for your Apex Webmail account.
 Click
here for a printer-friendly version of these instructions. Click
here for a printer-friendly version of these instructions.
1.
While logged in to your Webmail account, click on the
"Settings" button in the upper right corner.

2.
Click on the "Spam" tab.

3.
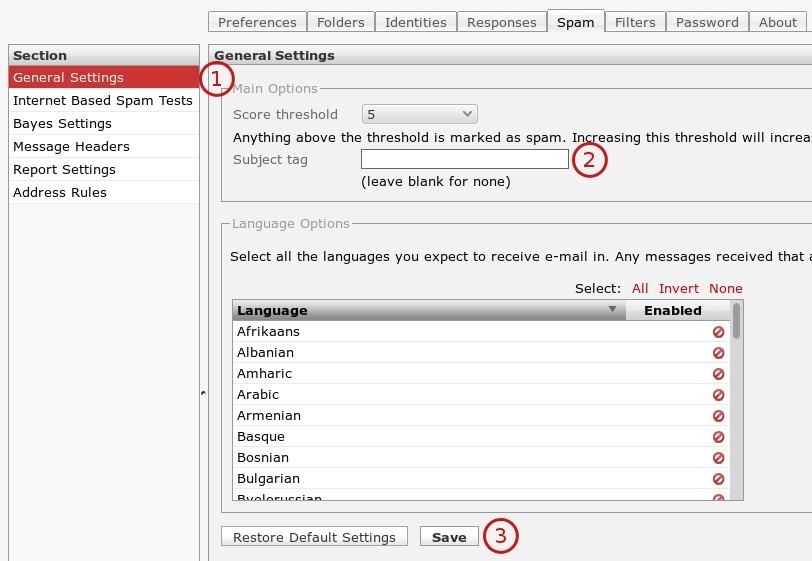
In the left pane, select "General Settings".
We recommend setting "Subject tag" to blank
(empty), as shown below. When finished, click on the
"Save" button to save your changes.

4.
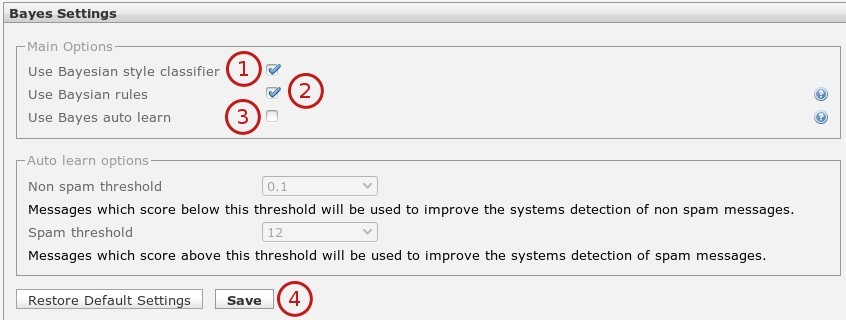
In the left pane click "Bayes Settings". Set
the following options then click Save to save the settings:
- Use
Bayesian style classifier : Checked
- Use
Bayesian rules : Checked
- Use
Bayes auto learn : Unchecked

5.
Click on the "Filters" tab.

6.
Click on the Plus Sign in the lower left corner of the
screen.

7.
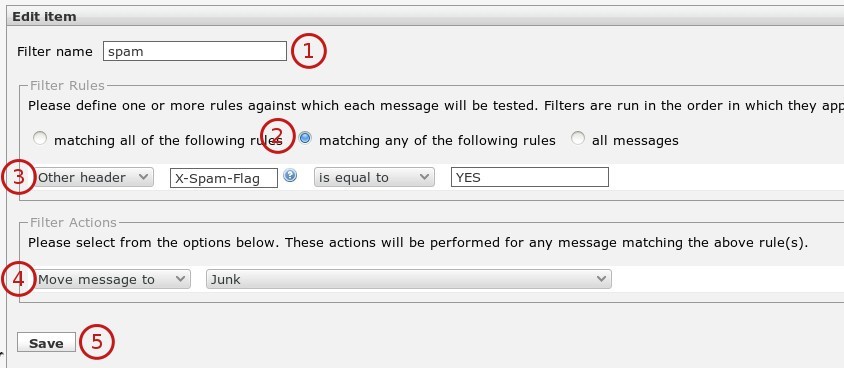
Near the center if the screen, enter in the options
as shown below, and click Save to save your changes.

8.
This completes the initial setup. When new messages
arrive to your mailbox and are detected as spam, they
will be moved to the "Junk" folder. This folder
will show up as "Spam" if you are checking
your mail from another program or device.
Using
the spam filtering feature
1.
If you receive messages that are not marked as spam
and are left in your Inbox, select the message and click
on the "Mark as Junk" button in the toolbar.

This
will tell the spam detecting engine to mark similar
messages to it as spam in the future, and the message
will be moved to the Junk folder. The more messages
you mark as junk, the more accurate the spam filtering
engine will work.
2.
Be sure to check the "Junk" folder (or "Spam"
folder if in another program or device) for any messages
that may be falsely marked as spam. If there are any
messages that are falsely detected as spam, simply highlight
the message in the list, and click on the "Mark
as Not Junk" button in the toolbar.

3.
You may also force emails received from certain email
addresses to never get marked as spam. To do this, follow
these steps:
- Go
to the Spam Settings: (Click the Settings button in
the upper right corner, then the Spam tab).
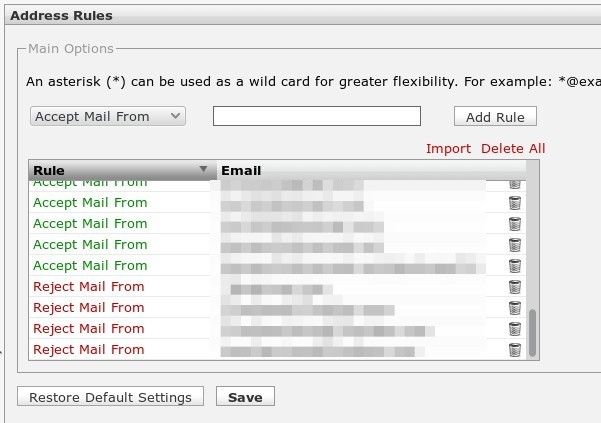
- In
the left pane, click on "Address Rules".
- Use
the drop-down menu to select "Accept Mail From",
enter in the email address, and click "Add Rule".
Adding this to the list will ensure messages from
the specified address will not be marked as spam.
- You
may also click "Import" to automatically
import all email addresses from your Address Book,
which will automatically add them as "Accept
Mail From".
- Click
"Save" to save your changes.

 Click
here for a printer-friendly version of these instructions. Click
here for a printer-friendly version of these instructions.
|

