| Apex
Webmail Forwarding Setup
Apex
Webmail offers full email forwarding capabilities. Please
read below for the setup that suits you best.
 Click
here for a printer-friendly version of these instructions. Click
here for a printer-friendly version of these instructions.
Forwarding
Filtered Email (Recommended)
This
method will forward all email that is not caught by
any filters (including spam filters). We recommend this
method so that only good messages (non-spam) are forwarded.
1.
Set up Spam Filtering for your email account. If you
have not enabled Spam Filtering yet, click
here for the Spam Setup instructions, then follow
the remaining steps below for email forwarding.
2.
Click on the "Settings" button in the upper
right corner of the screen.

3.
Click on the "Filters" tab.

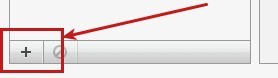
4.
Click on the Plus Sign in the lower left corner.
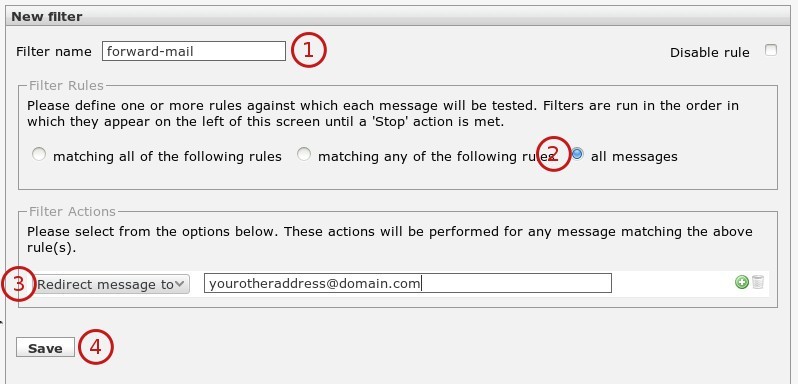
5.
In the details pane near the middle of the screen, enter
in the settings as below. Click "Save" when
you are finished to save your settings.
6.
In the left pane, make sure that the filter "forward-mail"
is listed below your "spam"
filter. Use the small up and down arrows to re-order
the filters if needed.
7.
Setup is complete! All clean (spam-free) email messages
will be forwarded to the account specified.
Forwarding
Unfiltered Email
This
method will forward all email regardless of any filters
you have set up. We do not recommend this method since
all emails (including spam) will be forwarded.
1.
Click on the "Settings" button in the upper
right corner of the screen.
2.
Click on the "Filters" tab.
3.
Click on the Plus Sign in the lower left corner.
4.
In the details pane near the middle of the screen, enter
in the settings as below. Click "Save" when
you are finished to save your settings.
5.
Setup is complete! All email messages will be forwarded
to the account specified.
Click
here for a printer-friendly version of these instructions.
|